|
|

Gauge Calculator version 1.1, which targets Windows Phone 8.1, enables a knitter or crocheter to easily do the arithmetic required to:
Version 1.1 implements the same two bonus features as version 1.0. It will:
The gauge estimation feature lets you estimate your gauge in stockinette stitch (knitting) or double crochet stitch (crochet) based on yarn weight and what you know of your tendency to vary from the gauges presented in patterns. The estimate can't be relied on to just dive in and start working up a project, but if you're shopping in a yarn store, see a nice pattern and some nice yarn that isn't quite what the pattern calls for, it can give you a rough idea of whether the two are compatible. The save and re-use feature lets you save key inputs that you have typed in and later load them back in. So you can enter in stitch count, and size information from a couple of potentially interesting patterns at home, go yarn shopping, and at the store, pull out your phone, estimate your gauge for an appealing yarn, pull up the gauge or stitch/row information you entered at home, and get an idea of whether you could get the size you want with that yarn. Gauge Calculator version 1.1 does not require you to opt-in or opt-out to data reporting. Instead, it supports creating bug reports that you can either manually send in or delete. You can see the whole bug report and edit out any details that you consider private before you have to commit to sending in any bug report. See the section Bug Reports for more information on this feature and its privacy implications. Weavers can also use Gauge Calculator to do the arithmetic for converting between ends, picks, ends per inch, picks per inch, and size (on the loom). Just think ends whenever the application mentions stitches and think picks whenever the application mentions rows. Note: The images in this document were captured on a phone set to the cobalt blue theme. Where you see blue in this document, on your phone you will see your theme's accent color. Gauge Calculator version 1.1 for Windows Phone 8 or later is a free application and has no ads. General Usage InstructionsGauge Calculator Windows version 1.1 is a standard Metro style application. The top of the screen has a banner identifying the product (Gauge Calculator), the logo identifying all applications I author, and the page name or mode. For all pages except the main, the page name area holds the name of the page.
The main page is a different from the others. The main page is a Metro pivot page. The large text in the page name area at the top reports which of the four modes is active:
The active mode will be much bolder in color and at the upper left of the page title area. The picture above shows the main page when compute-gauge mode is active. You can switch between the four modes by either tapping on the name of the desired mode in the page name area or by swiping right/left to bring a different mode in view. Each page (screen) in Gauge Calculator version 1.1 has an application bar at the bottom. The application bar provides access to actions specific to the page. If you are holding the phone narrow end up, the bottom of the screen has an application bar with four icons and an ellipsis (...). The application bar will be found to one side or the other if you are holding the phone long end up. Tap on the ellipsis to see the labels for any icons displayed on the application bar and to see the actions that I anticipate you will use more rarely.
For example, the application bar on the main page has four icons plus an additional three menu choices that can be brought into view by tapping the ellipsis or dragging the application bar upward with a finger. The icons are:
The three additional menu choices for the main page that are usually off-screen are:
Every page offers the two menu choices related to bug reports. During user testing, I encountered widespread confusion when I used Microsoft's basic display of lists. Without the cue of a scroll bar always visible when there were more items than fit in the display, the friends I did user testing on had no clue that scrolling might be an option. I chose to add an always visible partly opaque scroll bar on the right hand side of any list. It is visible even if the list is empty or small enough that all items fit.
The Settings PageBy default, the Gauge Calculator is configured to work with gauges specified as stitches and rows per standard 4 inch gauge square. The default configuration works with lengths and widths specified in inches. If you want to work with a gauge specified in one of the other common conventions, select the gear shaped icon in the application bar: 
The settings icon sends you to the settings page.
The settings page has two sections. The first section lets you indicate your preference for working in inches or centimeters. Tap the radio button for your current preference. When you change your preference, the information back in the main page converts to match your new preference. For more information how to take advantage of the auto-conversion feature, read the section on converting gauges. The second section lets you indicate whether you prefer enterring gauges as stitch and row counts for a standard gauge square (10 cm. or 4 in.) or whether you prefer entering gauges and stitches and rows per unit (e.g. stitches per inch).Tap the radio button to indicate your preference. Changing your preference will convert the information back on the main page to match. Gauge Calculator 1.1 lacks the third settings section present in version 1.0. Diagnostic information is now only sent when you request that a report be sent. There is no need to opt into or out of behind the scenes data reporting. Calculating Your GaugeTo calculate your gauge, you need to know the width and length of your swatch (or size specified in a pattern), the number of stitches, and the number of rows. Swipe along the top of the main page until the word gauge appears in bold. The picture that follows shows what you'll see if you selected the right pivot. 
If you have not already configured Gauge Calculator to use the units you want (inches or centimeters), follow the instructions in the section on configuring Gauge Calculator. Then come back to the gauge pivot of the main page. Enter your width, length, stitch count, and row count into the text boxes. You can use integers and decimal numbers. You can't use fractions such as 4 1/3. The input areas are normal Metro text inputs. If you don't have a keyboard or have not slid it out, the page will slide up to make room for a numeric input keypad below the text input.
Once you have typed a width and stitch count, you'll see the stitch gauge appear in the boxed value below the line. Similarly, once you have typed a length and a row count, you'll see the row gauge appear. The image below shows what you will see after filling in your sizes and counts. The gray background rectangles hold the numbers you type. The numbers in the rectangles outlined in red were computed by the Gauge Calculator. When Gauge Calculator recomputes the gauge for you, it copies the result not just to the outlined boxes in the gauge pivot. It also copies them to the gauge input areas of the stitches and size panes. 
You can go back and edit the swatch length and width, stitch count, and row count. Gauge Calculator will automatically update its calculations of your gauge. Updates are triggered when you change focus to a different field in the form or tap on a spot that isn't a text input. Calculating a Project's SizeTo calculate a project's size, you need to know your gauge, the number of stitches, and the number of rows. Swipe your way on the main page to the size pivot. The picture that follows shows what you'll see when you reach the right pivot. 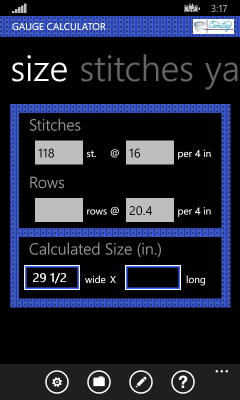
If you have not already configured Gauge Calculator to use the units you want (inches or centimeters), follow the instructions in the section on configuring Gauge Calculator.
Enter your gauge, stitch count, and row count into the text boxes. You can use integers and decimal numbers. You can't use fractions such as 4 1/3. Once you have typed a stitch gauge and stitch count, you'll see the width appear in the boxed value below the line. Similarly, once you have typed a row gauge and a row count, you'll see the project length appear. The image below shows what you will see after filling in your gauge and counts. The gray background rectangles hold the numbers you type. The numbers in the rectangles outlined in were computed by the Gauge Calculator. Gauge Calculator tries to present the sizes in a friendly fashion. A number like 18.2394095 is rather intimidating so Gauge Calculator will round to a more reasonable value. If you are using centimeters, it will round to no more than a couple of digits after the decimal (less if the result is a large number). If you are using inches, it will round to a multiple of an eighth of an inch (or quarter, half, or whole value if the result is a large number). For ease of understanding, fractions are given as fractions, such as 5 3/8 inches. 
You can go back and edit the gauge values, stitch count, and row count. Gauge Calculator will automatically update its calculations of the project size. Updates are triggered when you change focus to a different field in the form or tap on a spot that is not a text input. You can use Gauge Calculator to display the project size as either centimeters or inches. If you want to
learn more about how to use this conversion ability now, skip ahead to
the section on Converting Sizes.
To calculate how many stitches and rows you'll need to knit or crochet in order to produce a project of the size you want, you need to know your gauge and how big (i.e. how wide and how tall) you want your project to be. Swipe at the page title area until the word stitches is bold. The picture that follows shows a picture of what you'll see if you've selected the right pivot. 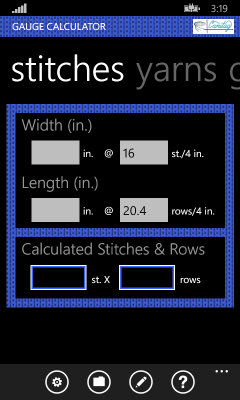
If you have not already configured Gauge Calculator to use the units you want (inches or centimeters), follow the instructions in the section on configuring Gauge Calculator. Enter your gauge into the text boxes. You can use integers and decimal numbers. You can't use fractions such as 4 1/3. Enter the desired project width and length. Once you have typed a stitch gauge and a desired width, you'll see the stitch count appear in the boxed value below the line. Similarly, once you have typed a row gauge and a desired length, you'll see the row count appear. The image above shows what you will see after filling in your gauge and sizes. The gray background rectangles hold the numbers you type. The numbers in the rectangles outlined in red were computed by the Gauge Calculator. You can go back and edit the gauge values, width, and length. Gauge Calculator will automatically update its calculations of the number of stitches and rows you'll need to work. Updates are triggered when you change focus to a different field in the form or by tapping somewhere other than a text input. If you are using a mix of centimeters and inches, be sure to read the labels on the text box to make sure Gauge Calculator is expecting the right thing. If not, go to settings and tell Gauge Calculator what unit you want to use. Gauge Calculator rounds the results to at most one decimal point when telling you how many stitches and rows to work. Estimating Your GaugeThe Windows Phone edition of Gauge Calculator can assist you in coming up with an estimate of your gauge. The estimate is based on guidance by the Yarn Council of America's yarn description standard and input from you about whether you tend to work more loosely than patterns' gauge requirements (i.e. need to go down needle or hook sizes to hit gauge) or work more tightly (i.e. need to use bigger needles or hooks). Swipe on the main page to reach the yarns pivot. The picture below shows what you'll see. 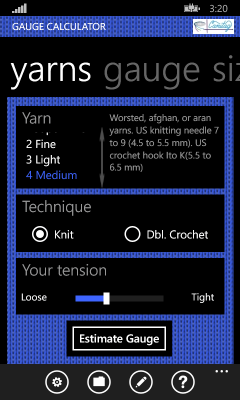
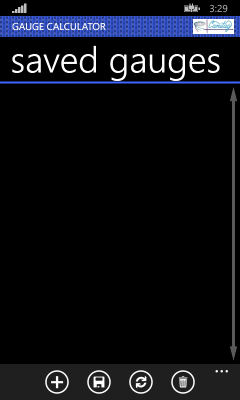
You'll find a list of yarn types under the area labeled Yarn. The yarn weights follow the Yarn Council of America's yarn weight system plus one added entry for super fine lace yarns. Scroll up and down to select the yarn weigh of interest -- from Fine Lace to 6 / Super Bulky. If your yarn does not have a Yarn Council of America weight value, you can read the description of the kinds of yarns that fall into the class to decide which weight category to use. Next select the kind of stitch you'd like to use. The gauge estimation feature supports two stitches: the (hand) knitted stockinette stitch and the US double crochet stitch. (Heads up: US double crochet is British treble crochet.). Tap the appropriate radio button to make your pick. If you have worked up patterns in the past and found that you consistently need to use a larger or smaller needle size to get the pattern's gauge, move the slider to reflect your tendency. Move the slider to the loose end if you tend to knit or crochet more loosely (i.e. your gauge squares turn out too big until you go to a smaller needle). Move the slider to the tight end if you tend to knit or crochet more tightly (i.e. your gauge squares turn out too small until you move up to a larger needle size). If the yarn is on the fine end of its category, you may also move the slider to the tight end. Click the button to generate a gauge estimate. The estimated gauge will be copied into the all of the gauge fields in the other pivots. Saving and Re-Loading Your GaugeGauge Calculator 1.1 lets you save your work and read it back at a later time. To save or restore, click on the Save icon on the application bar: 
This will send you to the Saved Gauges page.
This page has four icons on its application bar.
To save your work, click on the icon at the bottom that looks like a plus sign. This Add icon will bring up a dialog prompting you for a short reminder identifying the gauge data to be saved. Enter some text as shown in the image below then click the Create dialog button.
After you click the Create button in the dialog, you'll see a new entry in the list of previously saved gauges.
Gauge Calculator keeps the following information when its saves data:
The saved gauge value is taken from the best available value:
You can come back at any time to the saved data page and reload the data from a previous save. The data is kept until you use the saved data page to delete it (or until you wipe all data on your phone). The list of your saves is shown in the bottom portion of the saved data page. To load or delete a save, first tap it to select it. The text of the item you select will turn into your accent color, as illustrated in the following image.
If you click the Sync icon, the data will be loaded into the main page and you will be automatically sent back to the main page. If you click the Delete icon, you'll be given a chance to confirm that you do want to delete the save. If you confirm, the data will be deleted. Converting GaugesGauge Calculator can help you work with patterns that measure the gauge in units you normally don't work with. As an example, consider the plight of Chris. Chris wants to knit a sweater for a friend with a 34 inch bust and has found a lovely pattern that says to cast on 216 stitches with needles and yarn that deliver a gauge of 24 stitches per 10 cm. Chris wants to know if this pattern would work. Chri knows the gauge and the number of stitches so she selects the Size pivot of Gauge Calculator. Oops -- Chris knows the gauge in stitches per 10 cm. but the display is showing inches. So Chris taps on the settings icon, selects the radio buttons to the measure size in centimeters and gauge per 10 centimeters radio buttons, then uses the back button to get back to the size pivot of the main page. Now Chris enters the gauge from the pattern. Chris has measuring tapes and knows sizes in inches and is most comfortable working in inches and stitches per inch. So Chris taps the settings icon again, changes the radio buttons for inches and stitches per icon, and uses the back button to return to the main page. Chris sees that Gauge Calculator has updated its display to show that a gauge of 24 stitches per 10 centimeters is equivalent to a gauge of 6.1 stitches per inch. Chris enters the stitch count and learns that the sweater will be 35 3/8 inches around. That is a bit snug, but close enough that Chris figures it won't be hard to find a yarn and needle combination that will yield about 5.9 stitch/inch gauge, which would make the sweater just a bit larger around -- a nice fitting sweater, with an ease of 2.5 inches. Chris was planning to measure to get the right sleeve and torso length anyway so the slight increase in rows/inch is not an issue. Gauge Calculator recomputes the values you've already entered whenever you select a different radio button for the unit of measurement or gauge. You can easily convert between gauges in stitches and rows per inch, stitches and rows per 4 inches, stitches and rows per centimeter, and stitches and rows per 10 centimeters. Just select the radio buttons corresponding to the unit you want to type in, type in the gauge, then select the radio buttons for the units you prefer to use. Converting SizesGauge Calculator can help you work with patterns that state lengths and widths in units you normally don't work with. As an example, consider the plight of Robin. She bought baby hat pattern plus the amount and kind of yarn specified by the pattern. Robin sees that the gauge is 24 stitches and 32 rows per 10 centimeters on size 4 needles. Robin knows that 10 centimeters is almost exactly 4 inches so she does a swatch to confirm that her gauge is 24 stitches and 32 rows per 4 inches. Great! Now she casts on and starts knitting. Robin realizes that the pattern tells her to knit ribbing for 1.6 centimeters. Robin's ruler measures in inches. How far should she knit? Robin knows a size (1.6 cm.) and so picks a Gauge Calculator pivot with inputs for the size. Either the Stitch or Gauge pivot will work. Robin picks the Stitch/Row pivot, visits the Settings page, and taps on the radio button opting for measurement in centimeters. Robin decides it might be nice to know how many rows to expect to knit and so also selects the radio button for gauge measured per 10 centimeters. Now Robin enters the size and gauge from the pattern. Robin sees that knitting for about 5 rows will yield the 1.6 centimeter target length. Robin still wants to measure progress in inches so Robin selects the radio button to configure Gauge Calculator's measure in inches mode. Robin uses the back key to return to the main page of Gauge Calculator. She sees that that the display now shows that the gauge she entered (32 rows per 10 centimeters) is equivalent to a gauge of 32.5 rows per 4 inches. The rule of thumb about treating 4 inches and 10 centimeters as the same in gauge swatches checks out. That gives Robin confidence that Gauge Calculator is working properly. The expected row count is unchanged - still 5 - which is what Robin expected since row counts aren't measured in centimeters. The length measurement was converted. 1.6 cm. is approximately 0.625 inches (5/8 of an inch). Robin can measure that on a ruler. Gauge Calculator recomputes the values you've already entered whenever you select a different radio button for the unit of measurement. You can easily convert between sizes in stitches and sizes in centimeters. Just select the radio buttons corresponding to the unit you want to type in, type in the measurement, then select the radio buttons for the units you prefer to use. You can do the conversion whenever it is convenient. If you have a size in centimeters and a gauge per 10 centimeters, you'll find it useful to do the conversion after you've typed in the size and the gauge. If you happen to know mixed units such as a size in inches and a gauge per centimeter, the best approach is to configure Gauge Calculator for the unit you don't want to use (e.g. gauge per centimeter), type in the value in that unit, reconfigure Gauge Calculator for the unit you like, type in the second pair of values (e.g. size in inches), and view the results. Bug ReportingGauge Calculator version 1.1 supports creating bug reports that you can either manually send in or delete. If Gauge Calculator crashes, it will automatically attempt to log a bug report for the crash on your phone but will not automatically upload it anywhere. In addition, Gauge Calculator version 1.1 provides a page that enables you to create a bug report whenever you choose. Please use the create bug report feature only to report once on each feature that confuses you or that you feel is not working properly. Gauge Calculator 1.1 logs your most recent actions in memory. When you exit Gauge Calculator, this log goes away. When a bug report is created, the log of recent actions along with information about your phone's manufacturer and model plus all software versions is added to the bug report. This information is intended to help me figure out the conditions under which the bug happens. I promise that I'll only use it for the purpose of figuring out how to fix bugs in Gauge Calculator and improve the experience of its users. Gauge Calculator does not save data about your activity except in bug reports on your phone. Gauge Calculator only sends bug reports off your phone when you tell it to send a bug report. Bug reports are delivered to me via email, by handing over the entire bug report to Microsoft code that hands the email to (one of) your email program(s). You can see the whole bug report and edit out any details that you consider private before you tell your email program to send the bug report. You can always decide that you don't want to send the bug report after you read its content. Suggestion: if you replace information that you consider private with some word like PRIVATE, you will be giving me information about what kind of data my users find sensitive. I'll think hard about not collecting such data for bug reports in future versions of the application. If you tap on the ellipsis (...) in the application bar of any page, you'll see at least the following two menu choices:
When you click on the menu choice Create Bug Report, you'll be sent to a page prompting for two pieces of information.
The first field is a short description of the bug. It will appear in the listing of bug reports logged on your phone and in the subject of the email reporting the bug to me (if you choose to send such an email). Don't try to describe everything that went wrong. Just give enough to give me a general idea of the kind of problem. The second field is for a longer description of what you find confusing or think is incorrect behavior. It is helpful if you also add what you remember doing that led to the bug. The purpose of this is to tell me what to do to get the bug to happen on my phone. Anything you remember doing that was different from what you've done in the past without trouble is extra helpful. Gauge Calculator supplements the details you remember with details it holds in memory (not storage) so please don't get stressed out with worry that you might forget something. When you have filled in the two fields, click on one of the three icons in the application bar.
If you decide you don't want to create a bug report now, click the Delete icon. If you want to create the bug report but don't feel like sending out an email now, click the Save icon. If you want to create the bug report and send an email now, click the Upload icon. If you click the Upload icon, the bug report is also saved on your phone. After sending your email, Windows Phone will return you to the Report Bug page. You'll be asked whether you want to delete the bug report or leave it around. If you successfully sent the bug report email, I recommend deleting the bug report so that you aren't confused later about whether you sent it and aren't nagged about pending bug reports. The Show Unsent Bug Reports sends you to a page listing all bug reports that you haven't deleted and that haven't expired after 30 days. Note that if you have uploaded a bug report via email but chosen not to delete the bug report, it will still appear on this page.
There are two things you can do with a bug report: upload it via email or delete it. If you just ignore a bug report for 30 days, it will automatically be deleted. Click on the bug report that you want to act upon (its text will change color to your accent color) then click on the appropriate icon in the application bar.
The list of bug reports includes both those you create and those Gauge Calculator creates when it is crashing. Because bug reports are most valuable to me when they are delivered in a timely fashion, I've written Gauge Calculator 1.1 to remind you that you have pending bug reports when you first start the application. You'll see the following dialog pop up:
If you click the Now dialog button, Gauge Calculator will send you to its page listing pending bug reports. You can choose to individually delete or upload each of the pending bug reports. If you click the Never dialog button, Gauge Calculator will delete all pending bug reports. You won't be reminded about any of them again. If you see the dialog again, it will be because new bug reports have been created. If you click the Later dialog button, the dialog will be dismissed. You can use Gauge Calculator normally. If you exit Gauge Calculator entirely without deleting all of the pending bug reports and start Gauge Calculator afresh later, you'll see the dialog again. Copyright© 2011-2012 by Canitag(tm) Apps N Crafts. |